
Snapping a Panel in Place
Porch panels are fabric and clear vinyl assemblies that can be deployed to cover screened openings. They can thus be used to "weatherize"spaces that might otherwise be unusable in inclimate weather. Even so, they are easily rolled away or removed entirely to take advantage of better conditions.
There are some limits concerning porch panel widths and lengths. Clear vinyl does not look good when sewn side-by-side. Thus, the width of panels with clear vinyl running from side-to-side is limited to the width of the vinyl itself. The 30 guage "Crystal Clear" recommended for porch panel projects is available in 54 x 110 inch sheets. Thus, the maximum porch panel made from such sheets oriented horizontally is 110 inches (with a maximum window depth of 54 inches). And, of course, when the sheets are oriented vertically, the maximum width is 54 inches and maximum depth 110 inches.
Two basic types of panels will be detailed here: roll-up and snap-on. The snap-on panel is usually a solid sheet of clear vinyl with a facing of fabric to reinforce the snap installations and strengthen the panel edges. The roll-up panel is an assembly of fabric and clear vinyl that is secured along the top edge but detachable along the sides and free at the bottom so that it can be rolled up out of the way when not needed.
Snapping a Panel in Place
There is no need for the fabric calculator here since snap-on clear vinyl is simply cut so that it is at least 1 inch larger than the opening to be covered on all four sides. The vinyl will, of course, not ravel -- so shears can be used to do all the cutting of this material. These panels are likely to be rectangular. If so, be careful to cut all corners as right angles (a "T" square can be helpful). If the opening is irregular, establish a right angle base-line and measure up from that line vertically and also on the diagonals.

5-inch Weblon Strips for Facing
Using "Protect-It " with Velcro Tape Sewn in Place to Protect the Clear Vinyl

The Least Expensive Way to Install Snaps
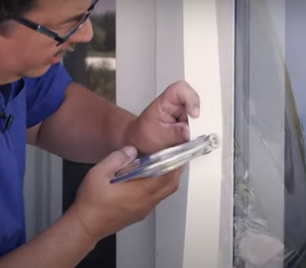
The Press-N-Snap Tool Speeds Button Installation on a Mounted Panel
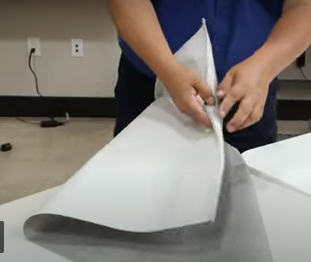
Turn next to the fabric that will be applied all round the vinyl as reinforcement and trim. Any durable outdoor fabric can be used here. We like to use Weblon Regatta because it is relatively light weight and highly tear resistant.
Cut 5 inch wide strips long enough to cover all the clear vinyl edges. If the material used is not likely to ravel, like the Weblon we recommend, shears can make the cutting process quick and easy. Fold 1/2 inch hems onto the "wrong " sides along the lengths of each strip. We like to place a line 1 inch inside the edges to be hemmed and fold to that line. Then fold each strip hem to hem to form a 2 inch wide facing that will be fitted over all edges of the clear plastic to reinforce it. Secure the top and bottom strips first. Transfer tape can be used to ensure the accuracy of each fold and to hold everything in place so that it can be sewn in one pass. Eric does a good job in the video explaining how all can be kept in order while performing this task.
Clear vinyl can be easily scratched during the sewing process. We like to prevent scratching with a pad of Protect-It™ Gray 63" Fabric (part number 122679) secured with Velcro tape at strategic points to the sewing surface as shown in the Video. Note that this protective fabric is not included in the Calculator 's list of materials since its size will be dependent on your work space.
Place a row of long straight stitches within an eighth-of-an-inch of the hemed edges of the facing strips and a second row within a quarter-inch or so of the panel edge.
Install snaps at all four corners of the panel within 1/2-inch or so of the edges.
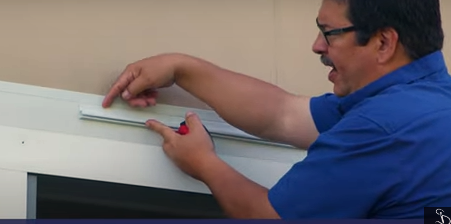
Carefully position the panel over the porch opening and place marks under the centers of the four corner snaps (Eric likes to use chalk to transfer each snap's location). Drill small pilot holes for the male snap studs so they can be screwed in place.
Space intervening snaps at intervals from 12 to 30 inches or so along each panel edge. Use a 1/8-inch drill bit to open a hole in the facing at those points and to place a shallow hole in the porch frame. Install female (or "button") snaps in the fabric and male snaps with screw studs in the frame. Here the "Press-N-Snap" tool can speed things up but the work can also be done with the inexpensive "pound in place" tools.

The Roll-Up Porch Panel Data Entry Screen
We define a roll-up porch panel as one made up of fabric with a clear window somewhere in its middle. Not only is the size of the assembled panels dependent upon your openings, so are the sizes of the top and center and bottom panel sections themselves. For these projects, you will find the calculator essential. Let's consider how best to use the calculator. (We will go over each calculator field below, but it should be noted that the same detail is also available by clicking on the "?" at each label -- click on "close" to clear.)
The first input field is "Finished Width". This measurement should overlap the opening frame at least 7/8-inch on both sides. The extra is to enable the installation of twist-lock fasteners to lock the panel in place when deployed. If multiple curtains are side by side leave at least 1 inch gap between adjacent curtains. If the frame is too narrow to permit this overlap reduce the width as necessary -- twist-lock-extention plates can be used -- more about that later. Note that more than one opening can be covered by a single panel so long as the maximum width stays under 110 inches (limited by the width of the Crystal Clear sheet).
The second input field is "Finished Length". Panels should overlap the frame opening at the top and bottom by a couple of inches or more to accomodate mounting hardware at the top and the 1 ¼” PVC pipe at the bottom. In order to be able to roll the panel completely up and out of the way, the overlap at the top should be at least 5 inches but this is optional.
Illustrating the Placement of Awning Track at the Top of the Panel
When these two fields have been entered, the calculator will fill in the remaining fields with default values.
Field "C" is The default length of fabric in the top section of the panel. This default is intended to be enough to completely wrap the rolled assembly and protect the clear vinyl from the sun, but this is not absolutely necessary and it can be overridden to adjust the window height when accompanied by change in the bottom vinyl fabric panel length. A minimum length of 2 inches is required to finish the top of the panel. The software automatically adds for hem allowance in the panel rendition, 1.63” in total. This is for a 1” hem at the top and 1” bottom hem. The awning rope will add about 0.37” to the overall length so that is subtracted from the resulting 2-inches.
Field "D" is the length of clear window panel. Modify the default to provide the desired field of view. Note that, by changing the length of the top and bottom sections, this clear section can be moved up and down. If the panel is more than 54 inches wide, the maximum length here will be just 54 inches (the clear vinyl length will run from side to side on the panel and the vinyl sheets are only 54 x 110 inches).
Field "E" is the depth of the bottom panel section. Adjust the window location, if desired, by changing the height of this bottom vinyl fabric panel and those above. A minimum length of 3 inches is required. The software automatically adds for a hem allowance and sleeve allowance in the panel rendition below, 6.75 inches in total. This is for a 1” hem at the top and 5.75” for a sleeve at the bottom for the 1 ¼” PVC pipe.
The above calculated fields must equal the finished length of the enclosure panel. The "Adjustment Field" amount shown in red is what is required in one or more of the three fields to equal that amount. This red number must be “0". Only then can panel renditions be generated.
These renditions are the heart of the calculator. The dimensions of each component fabric section required for a given panel are displayed at scale. The clear window will be defined under "List of Materials". The component fabric panels can be dragged anywhere on the surface of the scale fabric to reduce waste. Try it out! Enter 32, 72, in the first 2 fields. Default values will be calculated for the three remaining fields (C, D, and E) placing the clear window such that there will be enough fabric at the top to cover the clear vinyl when rolled up and enough at the bottom to make a sleeve for the PVC pipe at the bottom. Hit the "Add Panel" button.
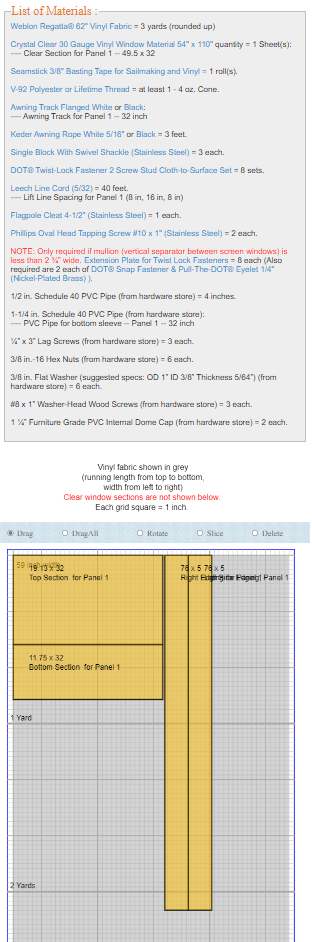
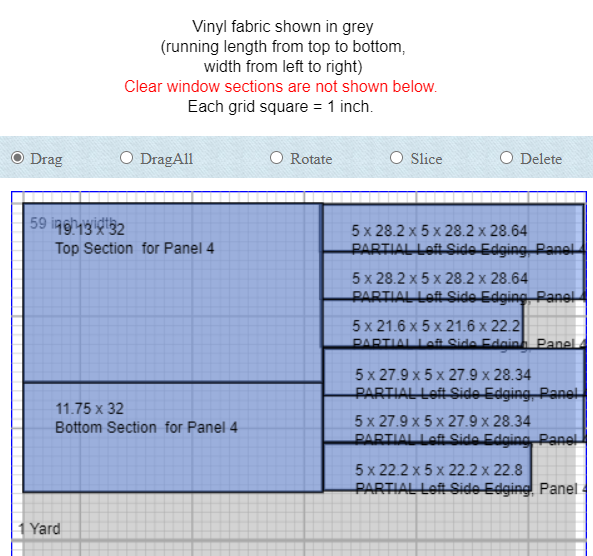
The 32 x 72 inch Panel Rendition
The window is to be 49.5 x 32 inches. The top section of fabric is 19.13 x 32 inches (will finish to 18.5 x 32) and the bottom section is 11.75 x 32 inches (will finish to 6 x 32). These finished lengths when added together equal 74 inches. Hems and a 1/2-inch seam at the bottom of the top panel and the top of the bottom panel will reduce the overall length by 2 inches to the 72 inches required.
Each time the "Add Panel" button is pressed, all the component window panels (by number in the list of materials) and the component fabric panels (by color in the rendition ) required for that porch panel will be created. The component fabric panels in the rendition are crudly "nested" by the software -- all facing strips will be vertical either to the right of the component panels or below them depending on overall size. They can be dragged from there to any location on the rendition either one panel at a time (if the "Drag" radio button is selected) or all the components of a panel at the same time (if the "DragAll" radio button is selected). Each panel can also be rotated and sliced to minimize the yardage required. Each time a panel or set of panels is modified, the total yardage required will be recalculated and displayed on the first line of the list of materials that is displayed just above the rendition. Click on the blue colored text in the list of materials to hyperlink to the Sailrite website where the items can be ordered -- place them in a shopping cart and then return to the calculator tab where additional blue text can be clicked and thus added to the existing cart. All will be preserved as you move from the calculator to the website and back until the cart is filled with all needed supplies which can then be ordered with just a click or two.
When additional porch enclosure panels are added (either with similar dimensions or new ones), the necessary component panels will be displayed just below previous renditons (with a one inch separation from the lowest edge of all previous panels). They will also be roughly nested with facing to the right or below.
Let's talk in more detail about the radio buttons at the top of the rendition. The "Drag" button will be checked once a pattern is added and by default after using any other button. Clicking ("touching" on moble devices) on a stack of patterns will drag the most recent one added to the stack. And, as noted above, the "DragAll" button moves all the panels of a single cushion at a time. If the "Rotate" radio button is selected, any pattern clicked will be rotated 1/4 turn so that the side that was "bottom" becomes parallel to the left edge of the fabric. The "Slice" button will cut away part of a pattern that is off the grey area either to the right or below and create a new pattern for the cut area in the upper left corner of the rendition. This can be an important feature since it is often possible to split a component panel or facing (edging) strip and nest it more efficiently.
Rotating, Slicing, and Draging the Facing for our 72-inch Panels Reduces Yardage by 50%
It should be noted that slice can only be used to separate two corners worth of pattern from the other two corners. That is, the software does not support five sided patterns or small slices from a single corner. An error message will be displayed if a slice attempt is made that does not conform to the system requirements.
These radio buttons, located as they are at the top of the rendition, will be awkward to use if the rendition becomes lengthy. And, since the buttons automatically return to "Drag" upon execution, they require frequent use. To overcome this problem, a right click (or long touch or two fingers depending on the device) brings up a context box with all the radio buttons so the appropriate action can be selected without leaving the current rendition location. (This "context menu" function does not currently work with Apple mobile devices -- it is thus necessary to access the radio buttons by scrolling to the top of the rendition with each use.) Once the action is selected, clicking on the appropriate pattern will execute it.
If more fabric is required to fit a panel, the app will add to the rendition length automatically. But you can also add yardage to the rendition yourself by clicking on the "Add 5 yards" button at the bottom of the rendition. 5 yards of additional fabric will appear below the current yardage in the rendition. All the component panels created thus far will be retained and they can be dragged onto the new fabric as needed. New panel reditions can be added as well.
Having nested the required shapes appropriately, all modern browsers (Safari, Firefox, Chrome, and Microsoft Edge) offer a "print" option which can be used to generate either a PDF file or, if a printer is available, a paper printout of the work done which can be used later to cut the fabric when it arrives, having ordered it from Sailrite. Those using phones or tablets can take "screen shots" of the rendition to preserve their work.